Hello Friends,
in our last post, we explained how to fix the Belkin router orange light but in this post, we have an out of box topic like port forwarding. If You Need To Forwarding Port In Belkin Wireless Router Please Follow the Instructions and Get It Going. Let’s Go And Fix It –
Belkin Router Port Forwarding
The Port forwarding process is Dependant on the Brand and Model Number of the Router being used. Sometimes For Some Type Of Games Or Program, You Need to Do Port Forwarding In Your Router.
Security Or Home Camera Also Need Port Forwarding sometimes For better Connectivity and Performance. in our last post we explained Belkin router not working but this issue is a bit different so it needs different troubleshooting methods.
Requirements- These Are the Things That You Might Need Before You Go And Try to do the Belkin Router Port Forwarding.
- The IP address of the computer or device to have the port forwarded to
- The port numbers to be used and whether they are TCP or UDP ports
- The router is connected to the computer using an Ethernet cable.
Before you go further please make sure you have update belkin router firmware to the latest version of the Belkin dashboard that may have a lot of features.
Port forwarding of a router is required with your system to allow the user access to your Connected application Or device. Regardless of the Belkin Wired Router being used, the process of port forwarding is similar to every other Router.
You will need to enable the ports by locating the port range forwarding screen. With most Belkin routers the port forwarding screen is located within the Virtual Servers option tab.
The setup instruction outlined below is an example of port forwarding using Belkin Model F5D8230-4.
Instruction To Belkin Router Port Forwarding
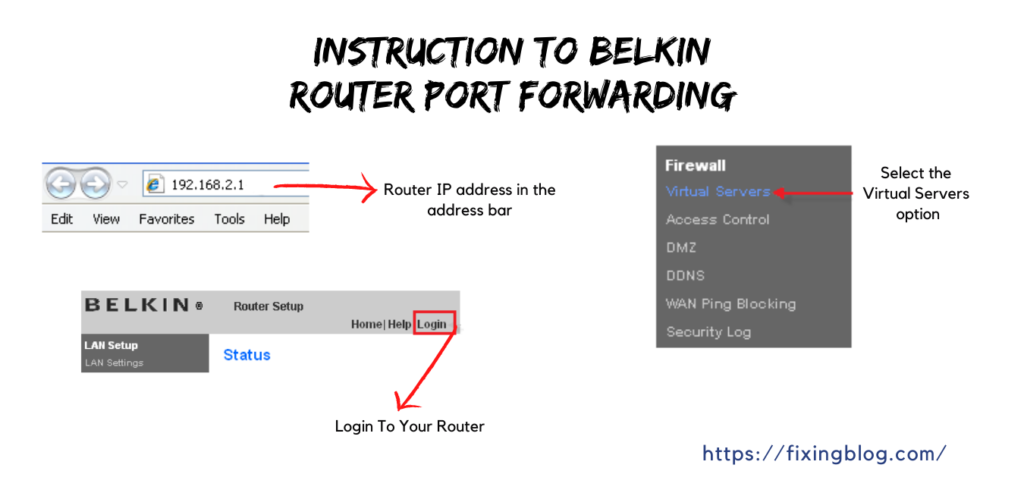
Step 1: Open your web browser. Enter the router IP address 192.168.2.1 in the address bar And Login into Your Router.
Step 2: On the status page, select the Virtual Servers option located down the left-hand side of the page.


Step 3: On the Administrator’s page, enter your password. The default setting is left blank.
Select the Submit button.
- In Case You Can’t access Belkin Router Please Reset Your Belkin Router and setup it Again Please Follow: How to setup Belkin router
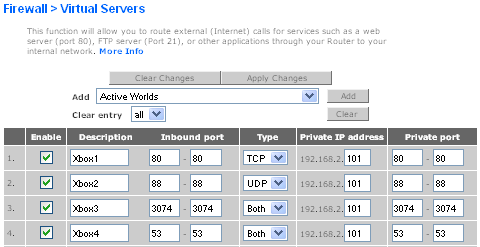
- In the Virtual Server, the screen proceeds as follows: – Enable the system by checking the enabled box –
- Now In the Description column enter a description of the Device that You Want to forward the port. –
- In the Inbound Port entry field enter in the first box the first number of the port you need to port forward and the ending port number in the second box (e.g. 80 – 80) – In the Type field, select Both.


- Now In the Private IP Address field, enter the IP address of the Device(Xbox, DVR, ETC.)
- In the Private Ports column re-enters in the first box,
- the first number of the port you need to port forward and in the second box the ending port number (e.g. 80 – 80). –
- Select the Apply Changes button located at the top of the page to save your changes Port forwarding is now complete for the Belkin router
For Any Other Help: official belkin Support
🙂 I hope this will help you do Belkin Router Port Forwarding.

Hold down your Windows key and R key
A run window should open.
Type ” cmd ” without commas
Type ” ipconfig ” without commas
Find your iPv4 address, ignore iPv6 that is totally irrelevant.
Your iPv4 address should be 192.168.1. (number between 1 – 256)
Write that number down.
—-
Port Forwarding
IP = iPv4 – 192.168.1. (The number you wrote down earlier 1-256)
Port = 25565
—-
Connecting to Minecraft client using your External IP
You can find this by googling “What’s my IP?”
for port forwording follow these step-
Step 1:
On your computer, open a web browser such as Internet Explorer® or Safari®.
Step 2:
In the address bar, enter “192.168.2.1” and press [Enter] on your keyboard. You will then be directed to the router’s web-based setup page.
Step 3:
Click Login on the upper right corner.
Step 4:
Once prompted to log in, enter your router’s Password then click Submit.
Step 5:
Under the Firewall section, click Virtual Servers.
Step 6:
Click the Enable box and enter the following information:
• Xbox1 field – Enter “80” on the fields under Inbound port. Set Protocol to TCP. Enter the Xbox LIVE®’s IP address in the Private IP address field and enter the Private port information in the assigned fields.
Step 7:
Click Image to save the settings.