Hello Folks
Welcome to fixingblog.com
Follow the instruction to setup printer with wireless
Dell Printer Wireless Setup
- Turn on your printer and a computer connected to your wireless network.
- Insert the Software and Documentation CD that came with your Dell
- printer into your computer’s disc drive. or you can also download your printer driver and software.
- Accept the terms of the License Agreement, and follow the directions..
- Connect your USB cable to your computer and your printer, if the on-screen instructions ask you to. Disconnect the cable when it tells you to as well.
- Complete the installation process as instructed, and then configure your printer and align your cartridges.
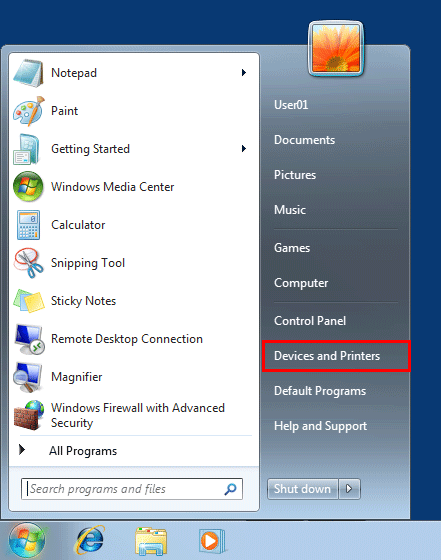
- Click the Start button and then choose Control Panel.
Double-click Devices and Printers from the Control Panel.
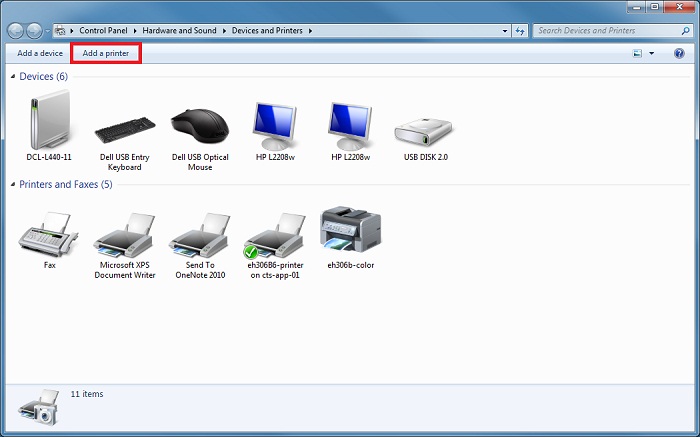
- Click Add a printer.
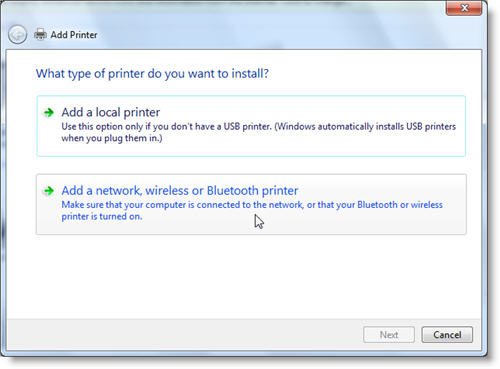
- Select the option for adding a wireless or network printer
- Windows will search for any printers on your network.
Select your printer from the list
- If the Add Printer Wizard pops up, select your printer’s Manufacturer and model, and click OK.
Complete the rest of the steps until you click Finish
Add your printer through wireless
- Ensure the USB cable is attached to both the printer and the computer
Click Start-> Click Programs-> Click Dell Printers-> Click Dell Printer Home-> Click the Settings tab-> Click Wireless setup utility.
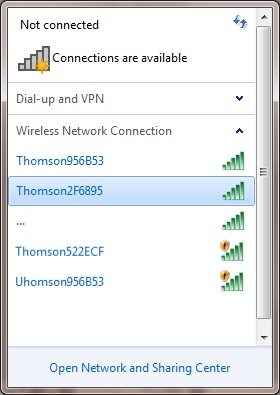
The printer looks for nearby wireless networks and displays them. Your Wireless Network Name Appears in the List
- Click on your network and click on continue.
- Enter the network key
- The Allow Dell Software window may appear if so click OK or Continue.
- When instructed remove the USB cable from the computer and printer
- Printer is setup on the network now
🙂 I hope this will help you.


Turn on your printer and a computer connected to your wireless network.
Insert the Software and Documentation CD that came with your Dell printer into your computer’s disc drive. or you can also download your printer
Accept the terms of the License Agreement, and follow the directions from the software.
Connect your USB cable between your computer and your printer, if the on-screen instructions ask you to. Disconnect the cable when it tells you to as well.
Complete the installation process as instructed, and then configure your printer and align your cartridges.
Click the Start button and then choose Control Panel.
Double-click Devices and Printers from the Control Panel.
Click Add a printer. Select the option for adding a wireless or network printer. Windows will search for any printers on your network.
Select your printer from the list. If the Add Printer Wizard pops up, select your printer’s Manufacturer and model, and click OK.
Complete the rest of the steps until you click Finish
i hope this will help u out…
Ensure the USB cable is attached to both the printer and the computer
In the Search box, type Wireless setup utility in the search box.
Touch or click Wireless setup utility and follow the prompts.
During the process the printer looks for nearby wireless networks and displays them.
Your Wireless Network Name Appears in the List
Click on your network and click on continue.
Enter the network key
The Allow Dell Software window may appear, if so click OK or Continue.
When instructed remove the USB cable from the computer and printer
Printer is setup on the network now
Your Wireless Network Name Does not appears in the List
Click Unlisted Network
Enter the Network Name, then click Continue
Select the type of Network Security the wireless router has, then click Continue, then enter the network key
The Allow Dell Software window may appear
When instructed remove the USB cable from the computer and printer
Printer is setup on network now.
In case the above does not work. Try connecting using WPS, providing router is WPS Complaint (a WPS complaint router will have a logo on it )
On the Printer Operator Panel, press Set up, then select Network Set up, then select WPS PushMethod or Pin Method
Please select the Pin Method, a 8- 10 digit Number will be listed under the PIN method.
Enter the WPS PIN on the router security page ( under WPS option).
Click on the Wi-Fi Icon for the Printer Setup over wireless network.
Ensure the USB cable is attached to both the printer and the computer
Click Start.
Click Programs.
Click Dell Printers.
Click Dell Printer Home.
Click the Settings tab.
Click Wireless setup utility.
The printer looks for nearby wireless networks and displays them.
Your Wireless Network Name Appears in the List
Click on your network and click on continue.
Enter the network key
The Allow Dell Software window may appear, if so click OK or Continue.
When instructed remove the USB cable from the computer and printer
Printer is setup on the network now
For Windows 10
Ensure the USB cable is attached to both the printer and the computer
In the Search box, type Wireless setup utility in the search box.
Touch or click Wireless setup utility and follow the prompts.
During the process the printer looks for nearby wireless networks and displays them.
Your Wireless Network Name Appears in the List
Click on your network and click on continue.
Enter the network key
The Allow Dell Software window may appear, if so click OK or Continue.
When instructed remove the USB cable from the computer and printer
Printer is setup on the network now
To connect using Wi-Fi Protected Setup (WPS):
Confirm both your router and printer support WPS.
Press and hold the WPS button on your printer. A message indicating WPS mode is running should appear on the screen.
Press and hold the WPS button on your router.
Allow up to 2 minutes for the devices to connect.
Print a Settings Report to confirm the printer has successfully joined your wireless network.
To connect manually using the printer front panel:
Press the ‘Menu’ button.
Select ‘System’.
Select ‘Admin Menu’.
Select ‘Network’.
Select ‘Wireless Setup’.
Select your network from the list.
Enter your network passphrase.
Print a Settings Report to confirm the printer has successfully joined your wireless network.