Hello Friends, Welcome to Fixingblog.com
Are You Trying To Setup Brother Wireless Printer?
If Your Answers Is Yes Then You Are On The Right Web page. this guide will Help You set up Your Brother Printer. please read the post till last and follow the steps one by one.
Table Of Contents
Brother Printer Wifi Setup
- First You Need The Brother Printer Driver And Software.
- Do You Have Any Installation Disk? If Yes Then Insert It Into Your Computer CD Drive.
If You Don’t Have The Software Disk? Don’t Worry
- You Can Download The Latest Printer Driver From Brother Website Visit.
- Now Download Printer Driver. And Click Next And Go Further With Steps
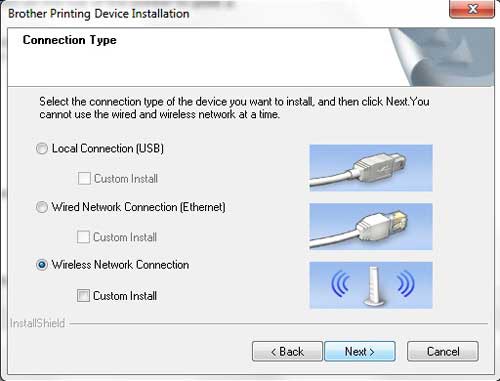
- It May Ask For setup Type Like This Image
- Please Select Wireless Network Connection And Click Next.
- Check And Confirm Your Wireless Network And Hit Next.
Now We Need to Enable Wireless In Our Printer –
- Please Plug Your Printer To Power.
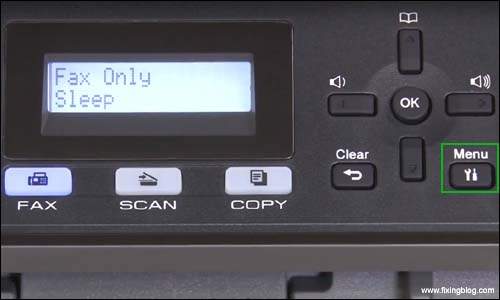

- Press The Menu Key And Go to The Network settings
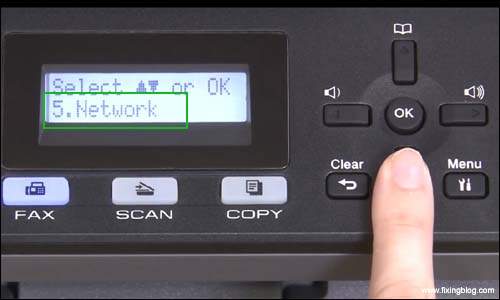

- Enable the WLAN And Select Your Printer Name And Type Your Password.
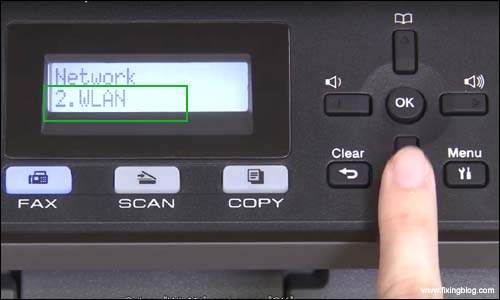

- Your Printer Will Connect The Wireless Network.
- Please Make Sure Your Firewall Is Not Blocking Your Printer Connection.
Read More: How to Connect Brother Printer To Wireless Network
This Will Help You Setup Printer That Has a small interactive screen With Menu Key.
See IF That Helps To set up Your Printer Without Any USB Cable.
Brother Printer Setup Using WPS
Some of The Printer Do Not Have a similar Option So You Might Face problems to setup those Model Of Printer to Your Wireless Network.
See If You Have WPS Key On Your Wireless Router. You Can Also Use That WPS Key To Connect Your Printer with Wireless In Few Clicks-
Here Is The Manual To Connect Your Printer Using WPS Key Please Visit Here FAQs & Troubleshooting
Connect Brother Printer to Wireless
Dear Friends, It’s Very Easy to Connect Your Brother Printer To Your Wireless –
Please Follow Steps to setup Printer with Network –
- Press The Menu Key at Your Printer.
- Go to The Network Wizard Look For Wireless Network.
- Select Your Wireless Network and Type Your Password
- Now Once it Connect, You Can Use a Printer to Print with a wireless router.
- For detailed Help and Steps visit Brother Printer won’t Connect To Wireless Network?
How to Add Brother Printer To Computer
Dear Friends Most Of The Time Windows Will Automatically Add Your Printer to the Printer List.
But In Case If Your brother Printer Is Not In Your Printer List Please Follow these steps to Add Your Brother Printer –
- Please Go to Control Panel >Hardware And Sound>Device And Printers.
- On The Right Hand Top Click On Add a Printer


- Select “Add a network, wireless or Bluetooth printer” and click Next.


- Now Windows Will scan for the printer and if detected, select the printer and click Next.
- If Your printer is not listed, click “The printer that I want isn’t listed” and skip to add the printer by name or TCP/IP address.
- We Will Recommend You To Add Your Printer Using TCP/IP
- Select “Add a printer using a TCP/IP address or host name”.Click Next.
- Now Type Your Printer IP Address and Click Next.
- For Printer IP Address Please Login To Your Wireless Router And Look For Connected Clients Or Device Connected.
- Here You Can See Your Printer Connected And See The Printer IP Address.
- Now You Can Use This IP To Connect Your Printer.
We Are Sure This Will Help You Configure Your Brother Wireless Printer.
Please Comment Below And Let Us Know If You Need More Help To setup Brother Printer.
We Thank You For Reading At Fixingblog.com

