Table Of Contents
Here some steps to reset Mac Device
it’s not as hard as you might think. you just need to follow these steps and you can Reset Mac computer.
before we start this we will advise you to take a backup of your data –
just restart the computer when your computer starts turning on you will have to press the command +R KEY at the same time and hold it for like 20 sec.
this will take you to Mac utility and here you can select disk space in which you have your O.S then click erases and then format the system.
Tips : – if you want to reset the mac computer because is slow and not responsive try this post also stuck on startup with white screen
Format or reset mac computer
Step 1:
Clone your hard drive for resetting your MacBook remove all the data from your Mac.
Obviously, you should transfer data from your old Mac to a new one, but it’s worth making a clone of the whole hard drive and keeping it around for a while.
The best way to do this program like carbon copy cloner for using an external hard drive choose your main hard drive as a source and internal hard drive as a destination now click on the clone. You should be able to boot from the cloned external hard drive.
To test this, reset your Mac and hold down Option when you first boot up your Mac. Use the arrow keys on your Mac to select the external drive and tap Enter. This cloned drive can be re-cloned back to the main drive if you decide to restore your Mac, or it can be used to access all the original files from your computer after you have wiped the internal hard drive.
This cloned drive can be re-cloned back to the main drive if you decide to restore your Mac, or it can be used to access all the original files from your computer after you have wiped the internal hard drive.
Step 2:
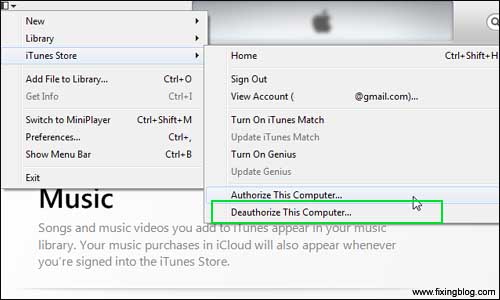
De-Authorising iTunes You should deauthorize your computer from iTunes. Open iTunes click Store -> Deauthorize this computer. Enter your Apple ID and Password then clicks De-authorize.


Step 3:
Turn off FileVault, FileVault encrypts the file in your hard drive, and it’s better to turn off before going any further
Open System Preferences and click on Security & Privacy and FileVault.
please Check that it says FileVault is turned off for the disc [main hard drive].If not click on the padlock icon in the bottom left, enter your password and click on Unlock. Now click Turn Off FileVault.
Disable Cloud In Mac-
Step 4:
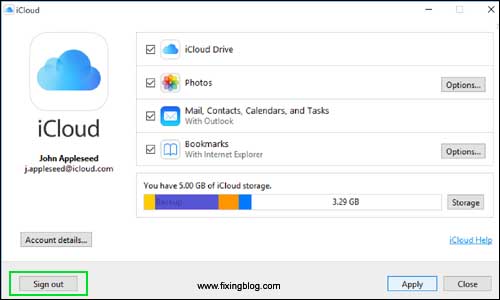
Disable cloud Open System Preferences and click on cloud and tap on Sign Out Now. To remove all your personal data, click ‘Delete From Mac’ on each pop-up


Step 5:
Restart the Mac in Recovery Mode First of all make sure you are connected to the Internet. You need an internet connection to install Mac OS X or macOS Sierra.
Restart the Mac by clicking on Apple > Restart and hold down the Command and R keys until the Recovery Mode Utility window appears.
Step 6:
Erase the drive Select Disk Utility and click on Continue. Now choose your main Startup Volume. Now choose the Erase tab and click Erase to wipe your hard drive.
Note that this permanently erases all data on the hard drive so don’t do this unless you’ve cloned the drive or are happy to never have to get something from that drive again.
When it’s finished exit the program by choosing Disk Utility and Quit Disk Utility.
Step 7:
Select Re-install Mac OS X Now click on reinstall on OS X or Mac OS.
continue to follow the screen instruction.
It will download and install a blank copy in your Mac OS X or Mac OS on the Mac. Do not enter your Apple ID and Password during setup through.
