There is not a single list of printer manufacturing companies that do not include the name of Epson. Its printers, along with other products, are renowned all around the world. The main credit of it goes to the quality that this company provides with its products along with other perks, such as guaranty, warranty, 24×7 helping service, etc.
But not everyone that buys a printer knows everything about it. Installing or setting up their printer can be quite hard work for many buyers. The manual guides that are provided by the company are often too technical and confusing for anyone who just bought his/her first printer.
The most common devices with which a printer is connected are a computer or a laptop. In this article, we will uncover the methods that will help you set up your Epson printer on your laptop or computer.
Table Of Contents
Ways to connect your Epson printer
Actually, the Epson printer’s installation process is quite easy if you have the right guidance. The modules that come in with its printers can be quite a handful to understand for a newbie. But don’t worry, that’s why this article is here. The ways by which you can connect your printer with your computer or laptop, based on whether they run on Windows OS or macOS, are given below.
Steps to connect your computer or laptop, running on windows OS, with your printer are as follows:
- Plug in all the required connections with your computer and then turn on the printer.
- Download and install Epson Connect Printer Setup Utility’s windows version from the official website of Epson.
- A window, by most probability, will pop up on your screen with the agreement that you need to accept for the printer to start working.
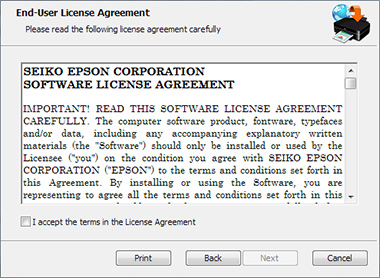

- After agreeing to all the conditions stated, click on install to start the installation process.
- Go through all the product names stated in the opened window and click on the name of your products and then click on next.
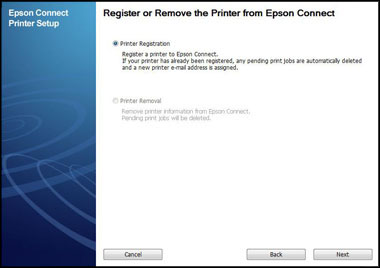
- Look for the Printer Registration option and then click on Next.

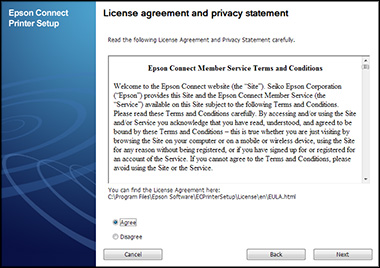
- Press enter on Agree option and then click on Next
- When you see the option of Register a printer to Epson Connect, then click OK.

- Then you will get the choice of either logging in with your existing account or signing up with a new account.
- Click on Close.
Read more About Epson error 0x97 and how to fix it.
connect the printer With your Mac
- Plug in all the required ports and then turn on the printer as well as your mac device.
- Download the Epson Connect Printer Setup Utility’s mac version from the official website of Epson.
- Look for the Continue button and click it
- Go through the conditions that will be stated in the agreement window that would have popped up by now.
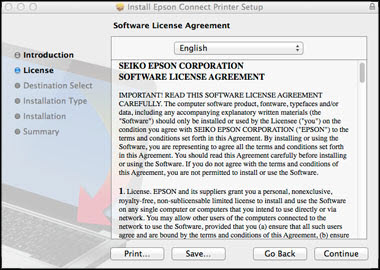

- Once done, agree to it all.
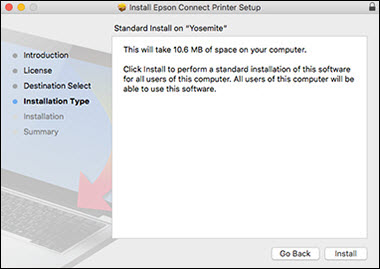
- Then click on install and then on the close button.

- Go through the list of printers that would have come up and then select your product name and then, click on Next.
In case of no window gets popped up after that, you can try and set up your Epson Printer by going into the Epson Connect Printer Setup inside the Epson Software folder.
- Look doe the Printer Registration and then click on the Next button.
- Click on OK.
- Now a window stating all the terms and conditions will pop up. Go through all the terms and conditions that are stated in it.
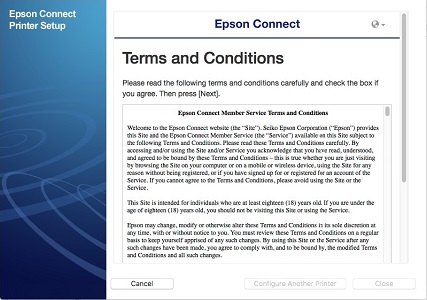

- After doing so, place a tick on the box near the statement that reads “I accept the Terms and Conditions” by clicking on the box. Click on Next in the down-right corner.
- You will get the option to log in to your previously existing account or sign up with a new account of yours.
- Once done with that, click on close.
Look out for the printer driver
The most common thing that can still cause printing problems for your printer can be its printer driver. Due to many unknown reasons, the printer driver on your computer can be outdated or wrong and hence, could be the reason that you can’t run a trial print run on with your printer after setting it up.
A printer driver is a software that allows your computer and your printer to interact with each other and understand what message one is trying to send to the other. This allows your printer to understand when your computer is commanding it to print your desired document.
When you buy an Epson printer, some discs come with it and they come with the required setup software. But drivers are installed as a local resource, on the computer.
If by any means, the printer driver is the cause, then follow the steps below to fix this problem.
- Click on the windows button.
- Click on settings, then on devices.
- Click on the icon that says Printers and Scanners
- Select Print server properties in the Related settings on the right side.
- Look for your printer on the Drivers tab and then select Next.
- Select the architecture of your device in the Processor selection dialog box and then, click on Next.
- Then select your printer’s manufacturer in the Printer Driver Selection box.
- Click on Next. Then on Finish, after selecting your printer driver on the right side.
- Then all you have to do is follow the instruction that has appeared on your computer’s screen.
Read More about how to fix Epson printer not printing
Conclusion
Epson printers are nonetheless one of the best printers among the printers that are sold by their competitors. Although the Epson printer’s setup can be quite hard to do, they are not a mission impossible.
The methods that are stated above can help you in setting up your printer with your computer, whether its OS is Windows or Mac.

